Your shopping cart is empty!
Shipping to United States starts at 6.01€
Your shopping cart is empty!
Shipping to United States starts at 6.01€
Below is information if you want to replace your old 2G unit with the current 4G unit.
We do not sell upgrade kits or similar; instead, you need to purchase a new unit and replace the old one.
Start by reading this information about the 2G network and our units.
The first step is to find out whether you have an older 2G/GSM model or a newer 4G model. This can be seen from the article number.
Article numbers starting with GSMS- use the 2G/GSM network and need to be replaced sooner or later.
For example GSMS-SW22, GSMS-SW22T, GSMS-PH3, GSMS-PH4, or GSMS-PH5.
Article numbers starting with OTAC- (and thus not GSMS-) use the 4G network and require no action due to the shutdown of the 2G and 3G networks.
For example OTAC-SW22T, OTAC-PH5, OTAC-AG, or OTAC-LM60T.
The article number is printed on the unit itself and in the order confirmation that was sent to your email address when you placed the order.
If you are unsure about any step, always refer to the user manual for your model.
All manuals can be found by clicking here
Click the article number you have below to see how to replace the unit.
This unit does not have the same connector as the new OTAC-PH5.
You should order OTAC-PH5 Universal and then connect it as described below.
1. Note which cable the RED cable on the PH3 is connected to, disconnect it, and connect the PH5 RED cable there instead.
2. Note which cable the BLACK cable on the PH3 is connected to, disconnect it, and connect the PH5 BROWN cable there instead.
3. Note which cable the WHITE cable on the PH3 is connected to, disconnect it, and connect the PH5 BLACK cable there instead.
4. IMPORTANT, also connect the PH5 GREY cable together with the PH5 RED cable!
5. Move the SIM card from the PH3 to the PH5.
6. Wait until the red LED turns off and send an SMS containing "PH0000OPMODE1" (without quotation marks).
Do not use the old PH3 antenna in the new PH5 unit!
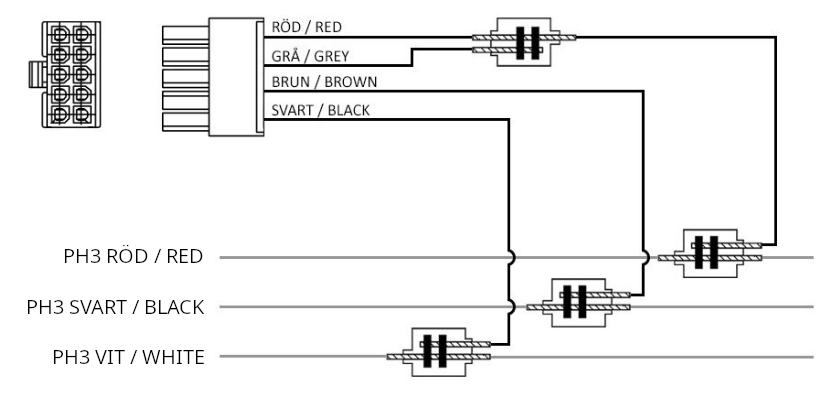
You also need to go into the app and click Settings > Manage profiles > click on your unit and then change from GSMS-PH3 to GSMS-PH5 in the list.
This unit does not have the same connector as the new OTAC-PH5.
You should order OTAC-PH5 Universal and then connect it as described below.
1. Note which cable the BLUE cable on the PH4 is connected to, disconnect it, and connect the PH5 RED cable there instead.
2. Note which cable the BROWN cable on the PH4 is connected to, disconnect it, and connect the PH5 BROWN cable there instead.
3. Note which cable the BLACK cable on the PH4 is connected to, disconnect it, and connect the PH5 BLACK cable there instead.
4. IMPORTANT, also connect the PH5 GREY cable together with the PH5 RED cable!
5. Move the SIM card from the PH4 to the PH5.
6. Wait until the red LED turns off and send an SMS containing "PH0000OPMODE1" (without quotation marks).
Do not use the old PH4 antenna in the new PH5 unit!
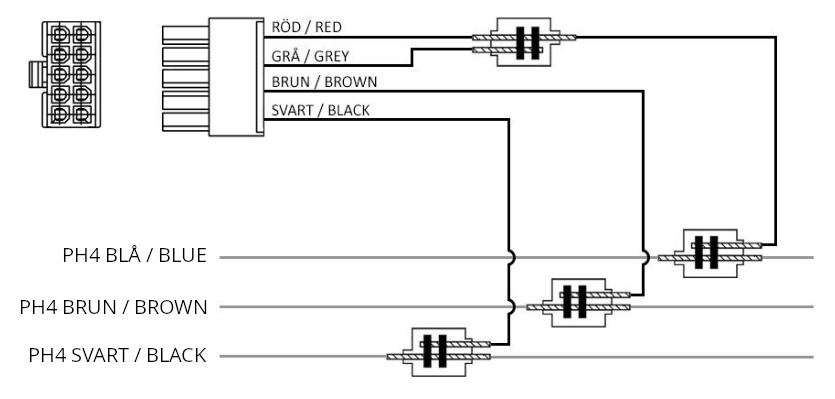
You also need to go into the app and click Settings > Manage profiles > click on your unit and then change from GSMS-PH4 to GSMS-PH5 in the list.
This unit has the same connector as the new OTAC-PH5.
Note that the old antenna you have in the GSMS-PH5 must not be used in the new OTAC-PH5. If you currently have a "Performance antenna" with a 3 m cable, you should select a new one when ordering.
Also note that the old push button for the GSMS-PH5 must not be used in the new OTAC-PH5. If you have a push button connected to "BUTTON" on the back of the GSMS-PH5, you need to select a new push button when ordering and replace it! IMPORTANT: the old button fits in the connector but can damage the new unit.
If you have a temperature sensor for your old GSMS-PH5, you do not need to buy a new one, as the old one fits the new OTAC-PH5.
You should order OTAC-PH5 Universal and then proceed as follows.
1. Send an SMS to your old GSMS-PH5 containing "PH0000SETTINGS", wait for the reply, and note the number shown under "OP MODE:", e.g. 1.
2. Then disconnect the old GSMS-PH5, move the SIM card to the new OTAC-PH5, and connect it instead.
3. Wait until the red STA LED turns off and then send an SMS containing "PH0000OPMODE1", replacing the last digit (1) with the value you had in step 1.
You do not need to do anything in the app and can now start using the new unit.
This unit has the same terminals as the OTAC-SW22T and is otherwise functionally identical.
Note that the old GSMS-SW22T supports 10A per relay and the new OTAC-SW22T only supports 5A per relay. Ensure that what you have connected to each relay does not draw more than 5A (~1150W @230V). Otherwise, you need to connect a contactor or similar between the SW22T and the load you intend to control.
Note that the old antenna you have in the GSMS-SW22T must not be used in the new OTAC-SW22T. If you currently have a "Performance antenna" with a 3 m cable, you should select a new one when ordering.
If you have a temperature sensor for your old GSMS-SW22T, you do not need to buy a new one, as the old one fits the new OTAC-SW22T.
You should order OTAC-SW22T and then proceed as follows.
1. Send an SMS to your old GSMS-SW22T containing "SW0000SETTINGS", wait for the reply, and use this as a reference when configuring the new OTAC-SW22T.
2. Then disconnect the old GSMS-SW22T and move the SIM card to the new OTAC-SW22T and connect all cables to exactly the same terminals as before.
3. You do not need to do anything in the app other than reviewing any settings. Use the SMS you received in step 1 as a reference.